
BROTHER BQ25
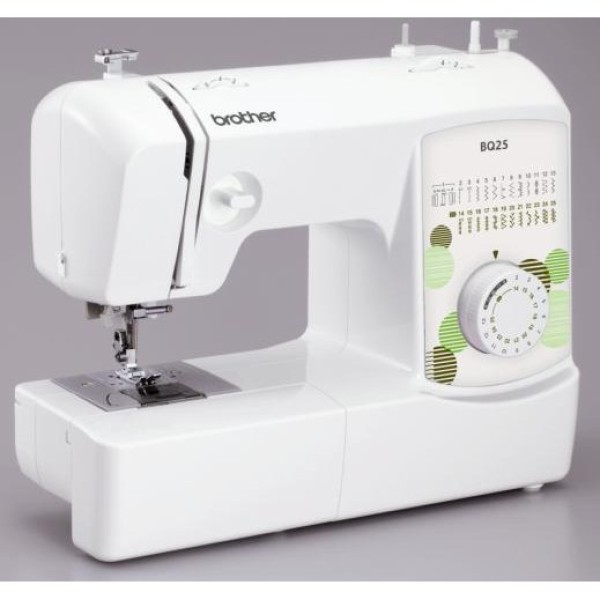

A mechanical sewing machine with 25 stitches, including a 4-step automatic buttonhole. You choose the stitch by turning the pattern selection dial and set its length with a separate stitch length dial.
You insert the bobbin from the top, under a removable cover, and a bobbin winder is built in. The needle threader makes threading the needle easier, the sewing light is an LED, and the thread cutter is built into the machine.
The flat bed attachment contains an accessory compartment. Removing the flat bed attachment gives you a free arm, handy for sewing cuffs, trouser legs and hard-to-reach areas.
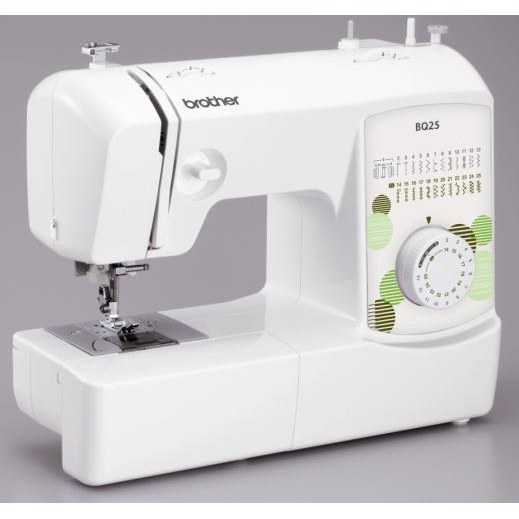
Features
25 stitches and a 4-step buttonhole
The 25 stitches comprise a 4-step automatic buttonhole, 2 straight stitches (needle at the left and in the centre), 3 zigzag stitches, shell tuck, elastic, stretch blind hem, scallop, bead, double action and bridging stitches, 2 triple stretch stitches, 3 triple zigzag stretch stitches, elastic overlock, feather, comb and fagoting stitches, and 3 decorative stitches.
You choose the stitch by turning the pattern selection dial in either direction. Raise the needle before you turn the dial: turn the handwheel towards you until the mark on it points up. If the needle is down, turning the dial may damage the needle, presser foot or fabric. The width of each stitch is preset, and you set the length with the stitch length dial. Setting the stitch length dial to the “SS” position changes the selected stitch to a stretch stitch (No. 14–25; their length is fixed at 2.5 mm).
Thread path
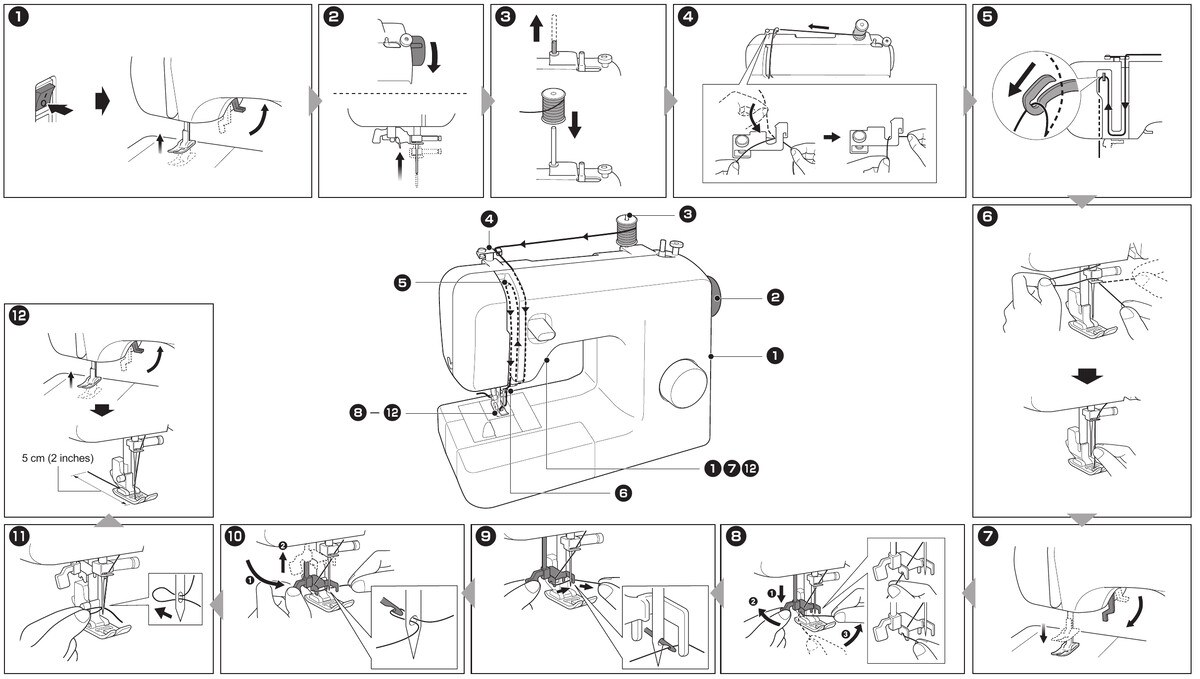
Before threading, switch the machine off, raise the presser foot lever and raise the needle (the mark on the handwheel must point up, otherwise the machine cannot be threaded). Put the spool on the raised spool pin and guide the thread as shown in the picture: through the groove of the thread guide (the spring must catch the thread), through the thread take-up lever from right to left and behind the needle bar thread guide.
You can thread the needle by hand from front to back or with the needle threader (see “More features”). Leave a thread tail of about 5 cm.
Bobbin winding
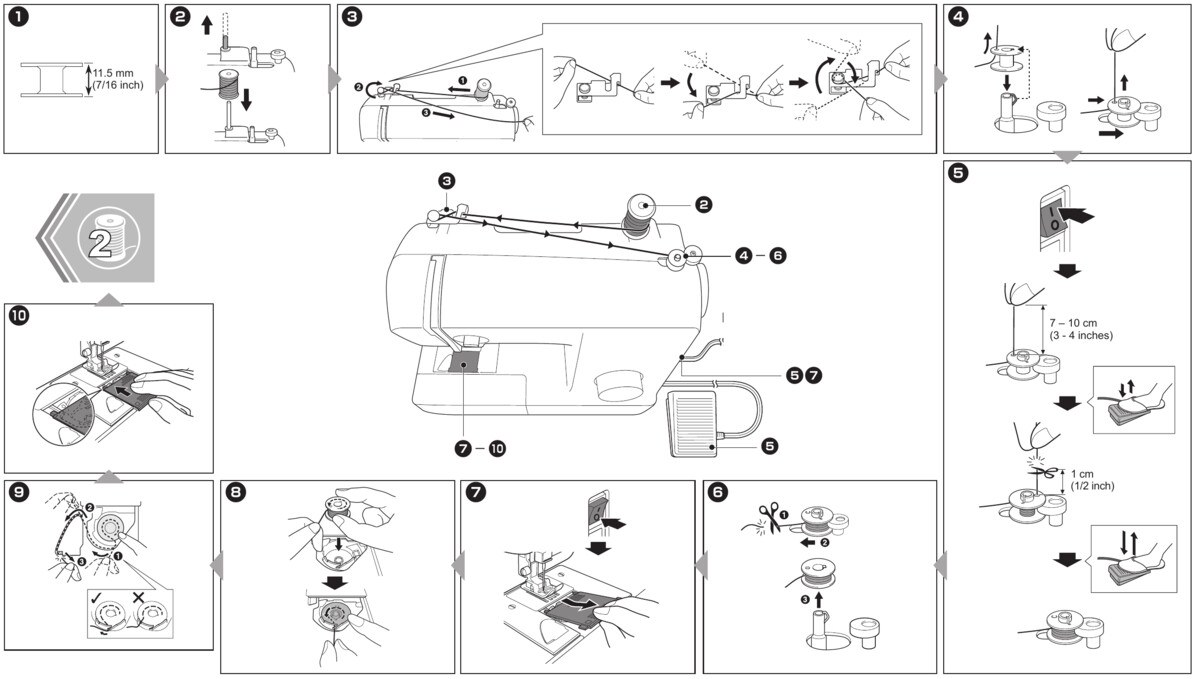
Raise the spool pin and put the spool on it. Guide the thread through the groove of the thread guide, around the pre-tension disc and pull it in completely, then pass the end of the thread through the hole in the bobbin from the inside (pull out 7–10 cm), put the bobbin on the bobbin winder shaft and slide the shaft to the right. Hold the end of the thread taut and pointing straight up.
Turn on the machine and, holding the end of the thread, gently press the foot controller so that the thread winds around the bobbin a few times, then stop and cut off the excess thread above the bobbin (leave about 1 cm from the hole). Continue winding until the bobbin seems full and starts spinning slowly. Then take your foot off the foot controller, cut the thread, slide the shaft to the left and remove the bobbin. Use only the bobbin made for this machine (SFB: XA5539-151).
Top-loading bobbin
Switch the machine off and raise the needle and the presser foot lever. Remove the bobbin cover (slide it and lift it towards you) and insert the bobbin from the top so that the thread unrolls in the direction of the arrow. Lightly holding the bobbin with your right hand, pass the thread through the slit and pull it towards you – it is cut by the cutter next to the slit. The bobbin must turn easily counterclockwise. Put on the cover (the projection goes into the groove) and press it closed; the end of the thread must come out towards the rear of the machine.
With this bobbin loading you can start sewing immediately, without drawing up the lower thread. When sewing gathers or darts, you can draw up the lower thread by hand so that some thread is left over – see page 19 of the manual.
More features
Stitch length dial
- The numbers on the dial show the stitch length in millimetres: the higher the number, the longer the stitch.
- The “F”–“1” range is for the satin stitch (close zigzag stitch), used for buttonholes and decorative stitches.
- If the stitches bunch together, lengthen the stitch.
Needle threader
- Pull the threader lever down as far as it goes and turn it towards the back of the machine – the hook passes through the eye of the needle and catches the thread.
- Then turn the lever towards you – the hook pulls the thread through the eye.
- The threader can be used with 75/11–100/16 needles; it cannot be used with a 65/9 needle, a wing needle, a twin needle, transparent nylon or metallic thread, or thread of 130/120 or thicker – thread the needle by hand.
Reverse sewing lever
- Push the lever in as far as it goes and hold it while you lightly press the foot controller – the machine sews backwards.
- Release the lever to sew forward.
- Use it to secure the start and end of a seam.
Thread cutter
- Pass the threads through the thread cutter on the machine to cut them.
Thread tension
- You adjust the upper thread tension with a dial.
- The lower the number, the looser the tension.
Foot controller
- The foot controller controls the sewing speed and starts and stops sewing: with a light press the machine sews slowly, and pressing harder increases the speed.
LED sewing light
- The main power switch turns the power and the sewing light on and off.
- The light source is a light-emitting diode (LED).
Changing presser feet
- Switch the machine off, raise the presser foot lever and the needle.
- Press the black button at the back of the presser foot holder to release the foot.
- Place the other foot so that its bar lines up with the slot on the shank.
Removable flat bed attachment
- Sliding the flat bed attachment to the left opens the accessory compartment.
- With the attachment removed you can sew on the free arm.
- When you have finished sewing, put the attachment back in place.
Maintenance
- The user must not oil the machine: it was lubricated at the factory with the right amount of oil, so periodic oiling is not needed.
- Unplug the machine before cleaning; clean the bobbin case area with the brush and do not oil it.
Stitches
You sew stitches No. 2–13 by choosing them with the pattern selection dial and setting the length with the stitch length dial (the recommended ranges are in the table), and stitches No. 14–25 by setting the stitch length dial to the “SS” position; their length is fixed.
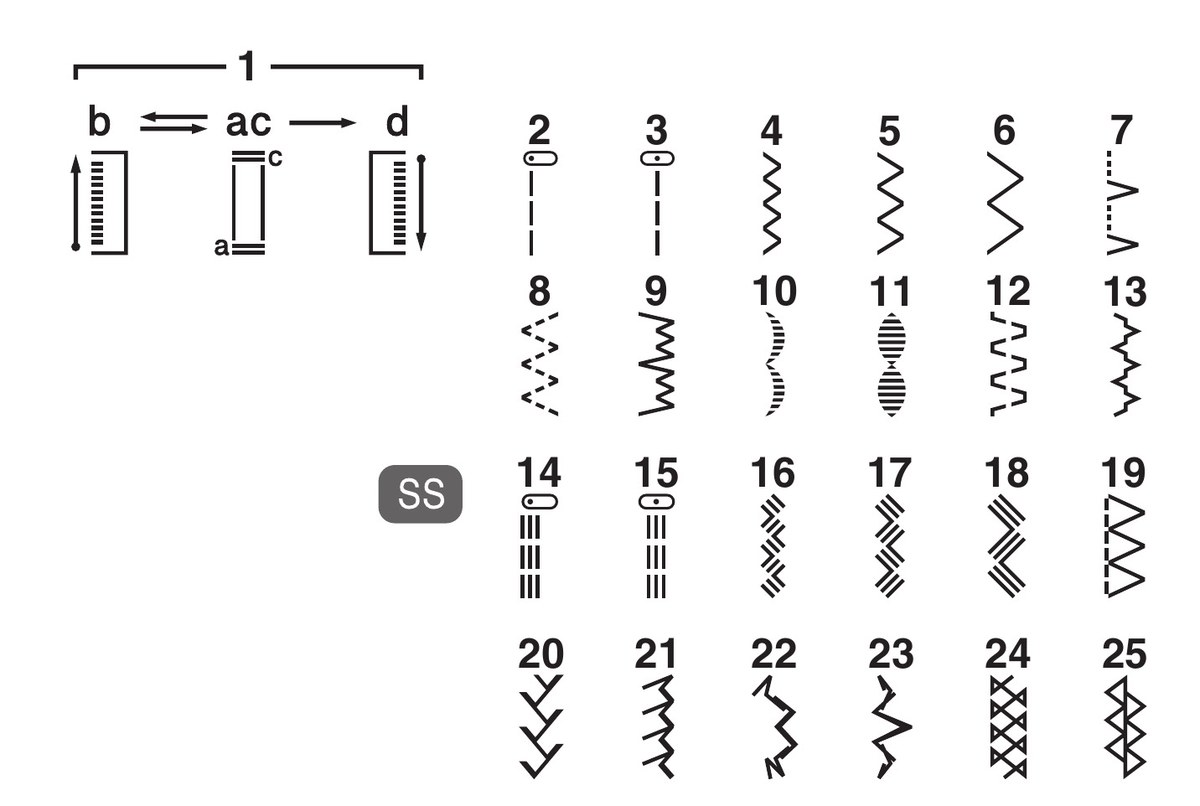
Stitch length and width
| No. | Stitch | Recommended length, mm | Preset width, mm |
|---|---|---|---|
| 1 | Buttonhole (automatic, 4-step) | F–1.5 | 5 |
| 2 | Straight stitch (left needle position) | 1–4 | – |
| 3 | Straight stitch (centre needle position) | 1–4 | – |
| 4 | Zigzag stitch | F–4 | 1.5 |
| 5 | Zigzag stitch | F–4 | 3.5 |
| 6 | Zigzag stitch | F–4 | 5 |
| 7 | Shell tuck stitch | F–3 | 5 |
| 8 | Elastic stitch | F–2.5 | 5 |
| 9 | Stretch blind hem stitch | F–1.5 | 3–5 |
| 10 | Scallop stitch | F–1.5 | 5 |
| 11 | Bead stitch | F–1.5 | 5 |
| 12 | Double action stitch | F–3 | 5 |
| 13 | Bridging stitch | F–3 | 5 |
| 14 | Triple stretch stitch (left needle position) | SS: 2.5 | – |
| 15 | Triple stretch stitch (centre needle position) | SS: 2.5 | – |
| 16 | Triple zigzag stretch stitch | SS: 2.5 | 1.5 |
| 17 | Triple zigzag stretch stitch | SS: 2.5 | 3.5 |
| 18 | Triple zigzag stretch stitch | SS: 2.5 | 5 |
| 19 | Elastic overlock stitch | SS: 2.5 | 5 |
| 20 | Feather stitch | SS: 2.5 | 5 |
| 21 | Comb stitch | SS: 2.5 | 5 |
| 22 | Decorative stitch | SS: 2.5 | 5 |
| 23 | Decorative stitch | SS: 2.5 | 5 |
| 24 | Fagoting stitch | SS: 2.5 | 5 |
| 25 | Decorative stitch | SS: 2.5 | 5 |
Sewing a buttonhole
You sew the buttonhole (No. 1) with buttonhole foot “A”, with the stitch length dial set between “F” and “1.5” and the pattern selection dial turned to positions a, b, c and d (positions a and c are the same). The front bar tack is sewn first. Practise on scrap fabric before sewing on a garment, and place stabiliser under soft fabrics.
- Mark the position and length of the buttonhole with chalk. Switch the machine off, attach buttonhole foot “A” and push its frame back as far as it goes, until it stops against the plastic insert at the front of the foot.
- Place the bar tack mark under the centre of the presser foot and line it up with the two red lines on the foot.
- Step 1 (front bar tack): set the dial to “a”, lower the presser foot and sew 5 to 6 stitches. Stop the machine when the needle is on the left side of the stitches and raise the needle out of the fabric.
- Step 2 (left side): turn the dial to “b” and sew the whole length of the chalk line. Stop the machine when the needle is on the left side of the stitch and raise the needle.
- Step 3 (back bar tack): turn the dial to “c” (the same position as “a”) and sew 5 to 6 stitches. Stop the machine when the needle is on the right side of the stitch and raise the needle out of the fabric.
- Step 4 (right side): set the dial to “d” and sew the right side until the needle reaches the stitches sewn in step 1.
- To finish, turn the fabric 90° anticlockwise and sew straight stitches to the end of the front bar tack.
- Remove the fabric from the machine, put pins across both ends of the buttonhole so the stitches are not cut, and cut the middle of the buttonhole open with the seam ripper. Keep your hand and fingers out of the path of the seam ripper.
- If the stitching on the two sides of the buttonhole differs, sew a test buttonhole on scrap fabric with the stitch length dial between “F” and “1.5”: if the right side is too open or too tight, adjust the feeding of the fabric with the stitch length dial. Then, if the left side is too open compared with the right side, turn the buttonhole fine-adjustment screw with a large screwdriver in the “–” direction, and if it is too tight, in the “+” direction.
What the stitches are for
- Straight stitches (No. 2 and 3): plain seams, top-stitching and sewing lightweight fabrics. It is recommended to sew straight stitches at the beginning and end of zigzag seams, as they reinforce the seam.
- Triple stretch stitches (No. 14 and 15): for sewing stretch fabrics.
- Zigzag stitches (No. 4–6): for appliqués – baste the cut-out piece of fabric to the fabric and sew around its edge with a zigzag stitch.
- Satin stitch: sewing a zigzag stitch (No. 4–6) with the stitch length dial in the “F”–“1” range gives a dense satin stitch, which suits buttonholes and decorative stitching. Test the exact dial position on scrap fabric.
- Shell tuck stitch (No. 7): for a picot (lacelike) edge on lightweight fabrics. Set the thread tension tighter than normal, sew slowly and place the fabric so that it is sewn along the bias, with the straight stitches on the seamline and the zigzag stitches slightly over the folded edge.
- Elastic stitch (No. 8): for mending, sewing on elastic and joining fabrics; it works especially well on knitted fabrics. With nylon thread the stitch is not visible.
- Stretch blind hem stitch (No. 9): for hems of skirts and trousers, without the stitches showing. Remove the flat bed attachment and sew on the free arm.
- Scallop (No. 10), bead (No. 11) and decorative (No. 22 and 23) stitches: for decorative top-stitching and smocking.
- Double action (No. 12) and bridging (No. 13) stitches: for joining two pieces of fabric, for example when making patchwork.
- Triple zigzag stretch stitches (No. 16–18): wherever you would normally use a zigzag stitch, but the fabric is thick and stretchy; also as decorative top-stitching.
- Elastic overlock (No. 19) and comb (No. 21) stitches: join the seam and finish its edge in one operation; No. 19 suits stretch fabrics. Place the fabric so that the seamline is about 3 mm to the left of the centre of the presser foot and the seam allowance is about 5 mm – the right (zigzag) side of the stitch then overlocks the cut edge of the fabric.
- Feather stitch (no. 20): decorative top-stitching for embroidering or hemming blankets, tablecloths and curtains.
- Fagoting (No. 24) and decorative (No. 25) stitches: for joining two pieces of fabric while leaving a space between them; the stitch looks more decorative with a thicker thread.
- Inserting a zip: straight stitch No. 3 (centre needle position), length 2–3 mm, and zipper foot “I”, which can be positioned on the left or the right side of the needle.
- Sewing on buttons: zigzag stitch No. 4, 5 or 6 (width 1.5, 3.5 or 5 mm depending on the distance between the button holes; stitch length dial at “F”), button sewing foot “M” and the darning plate on the needle plate. Measure the distance between the holes, sew about 10 stitches slowly, pull the upper thread to the wrong side of the fabric and tie it with the bobbin thread.
- Gathering: straight stitch No. 2 or 3. Loosen the upper thread tension so that the lower thread lies on the underside of the fabric, sew one or several rows of stitches and pull the lower threads.
- Darning: straight stitch No. 2 or 3 with the darning plate. Remove the presser foot and the presser foot holder, lower the presser foot lever, put reinforcement fabric under the area to be darned and alternate between gently drawing the work away from you and pulling it towards you until the area is filled with parallel lines of stitching.
- Twin needle: only the needle made for this machine, X57521-021 (2.0/75, 2 mm), with zigzag foot “J”. Only the straight stitch (centre needle position, No. 3), the zigzag stitch with a width of 1.5 mm (No. 4), the triple stretch stitch (centre needle position, No. 15) and the triple zigzag stretch stitch with a width of 1.5 mm (No. 16) may be used. The second spool needs the extra spool pin XE2241-001. Thread each needle separately, from front to back; the needle threader must not be used for the twin needle. Before sewing, check with the handwheel that the needle does not hit the presser foot. If the stitches bunch together, increase the stitch length.
- Thin fabrics: when sewing thin fabrics, the stitching may become misaligned or the fabric may not feed correctly. In that case, place thin paper or stabiliser material under the fabric and sew it together with the fabric; when you have finished, tear off any excess paper.
- Stretch fabrics: first baste the pieces of fabric together, then sew without stretching the fabric.
- Thick fabrics: if the fabric does not fit easily under the presser foot, raise the presser foot lever even higher to bring the presser foot to its highest position. Do not sew fabric thicker than 6 mm or push it with too much force – the needle may bend or break.
Fabrics, threads and needles
| Fabric or use | Thread | Needle |
|---|---|---|
| Medium-weight fabrics (“broadcloth”, taffeta, flannel, gabardine) | Cotton and synthetic thread No. 60–90; silk thread No. 50 | 75/11–90/14 |
| Thin fabrics (lawn, georgette, “challis”, satin) | Cotton and synthetic thread No. 60–90; silk thread No. 50 | 65/9–75/11 |
| Thick fabrics (denim, corduroy, tweed) | Cotton thread No. 30 | 100/16 |
| Thick fabrics (denim, corduroy, tweed) | Cotton thread No. 50 | 90/14–100/16 |
| Thick fabrics (denim, corduroy, tweed) | Synthetic and silk thread No. 50–60 | 90/14–100/16 |
| Stretch fabrics (jersey, tricot) | Thread for knits No. 50–60 | Ball point needle (gold coloured) 75/11–90/14 |
| Easily frayed fabrics | Cotton and synthetic thread No. 50–90; silk thread No. 50 | 65/9–90/14 |
| Top-stitching | Synthetic and silk thread No. 30 | 100/16 |
| Top-stitching | Synthetic and silk thread No. 50–60 | 75/11–90/14 |
| Any fabric or thread | Transparent nylon thread | 90/14–100/16 |
Technical specifications
| Type | Mechanical sewing machine |
|---|---|
| Number of stitches | 25, including the buttonhole |
| Buttonhole | Automatic, 4-step (buttonhole foot “A”) |
| Stitch selection | pattern selection dial |
| Stitch length and width | length is set with the stitch length dial (recommended ranges are in the table, up to 4 mm); the width is preset for each stitch (up to 5 mm); stitches No. 14–25 are sewn with the stitch length dial at “SS” (fixed length of 2.5 mm) |
| Reverse | lever (the machine sews backwards while it is pressed in) |
| Bobbin | top-loading; SFB: XA5539-151, 11.5 mm high |
| Needles | home sewing machine needles, sizes 65/9–100/16; for stretch fabrics a ball point needle (gold coloured) 75/11–90/14 (the manual recommends the “HG-4BR” needle, Organ; a Schmetz “JERSEY BALL POINT” 130/705H SUK 90/14 may also be used); for the twin needle only X57521-021 (2.0/75) |
| Needle threader | yes (works with 75/11–100/16 needles; not with a 65/9 needle, a wing needle, a twin needle, or transparent nylon and metallic thread) |
| Recommended threads | No. 30–90 (according to the manual's table), silk No. 30–60; thread of No. 20 or lower (heavier thread) must not be used |
| Fabric thickness | when sewing fabric thicker than 6 mm, the needle may bend or break (according to the manual) |
| Free arm | yes (remove the flat bed attachment) |
| Accessory compartment | in the flat bed attachment |
| Lighting | sewing light (LED); light source of energy efficiency class D |
| Thread cutter | yes |
| Bobbin winder | built in |
| Foot controller | according to the manual: KD-2902 for 220/240 V regions, KD-1902 for 110/120 V regions (the part code depends on the country or region) |
| Country of origin | Vietnam |
| Intended use | Household use (according to the Brother manual) |
| Warranty | 3 years |
In the box
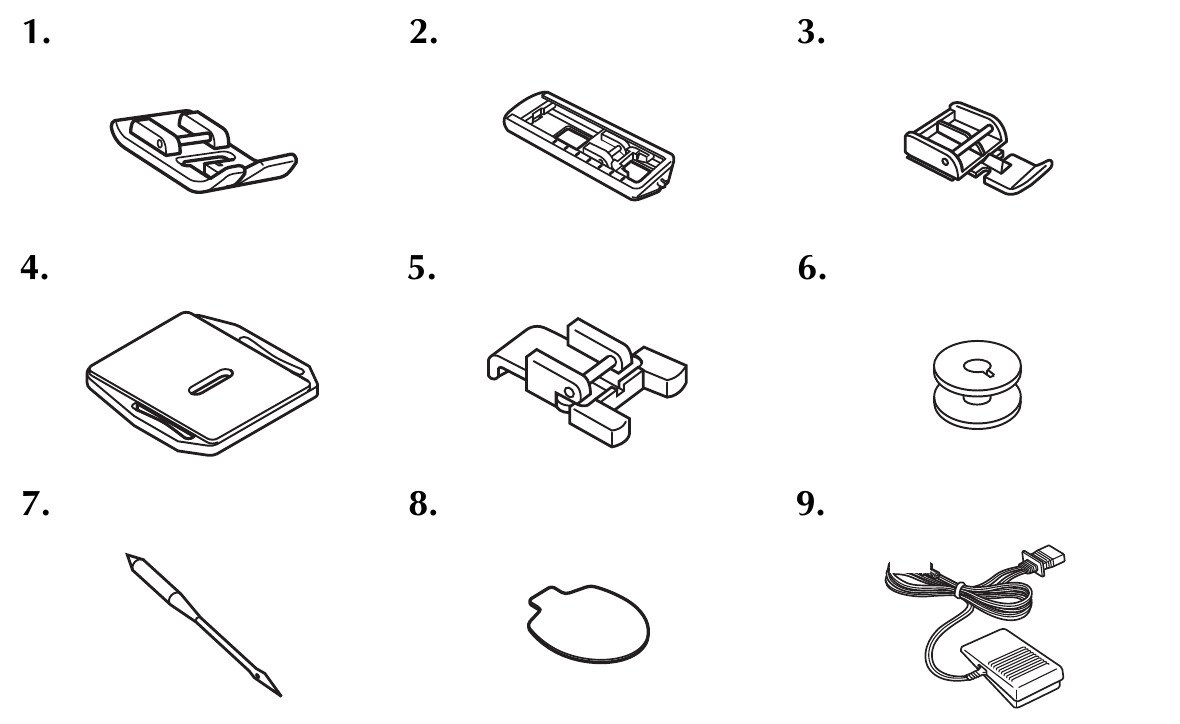
In the box according to the Brother operation manual; the manual notes that the included accessories may vary by model. The numbers match the picture.
- 1. Zigzag foot “J” (on the machine)
- 2. Buttonhole foot “A”
- 3. Zipper foot “I”
- 4. Darning plate
- 5. Button sewing foot “M”
- 6. Bobbin (one is on the machine)
- 7. Needle set (90/14)
- 8. Oval screwdriver
- 9. Foot controller (with power cord)
Optional accessories
Depending on the set, some of these accessories may already be in the box. List compiled from the Brother operation manual and the Brother support page section 'Consumables & Options' for this model.
- Bobbins, 10 pcs (SFB)
- Bobbins and bobbin clips (BCL)
- Wide table WT9
- Patchwork kit FP03
- Twin needle (2.0/75) X57521-021
- Extra spool pin XE2241-001
- Adjustable zipper/piping foot F036N
- Blind stitch foot F018N
- Concealed zipper foot F004N (for easy installation of concealed zippers)
- Edge joining foot F056
- Narrow hemmer foot F003N
- Non-stick foot F007N
- Overlock foot F015N
- Picot foot F029N
- Stitch guide foot F035N
- Straight stitch foot F011N
- Vertical stitching alignment foot F063
- Concealed zipper foot F080 (no need to press the zip edges before sewing)
- Binding foot F014N
- Braiding foot F021N
- Clear-view foot F023N
- Cording foot F024N
- Fringe foot F025N
- Gathering foot F012N
- Open toe foot (metal) F060
- Open toe foot F027N
- 1/4-inch patchwork foot F001N
- 1/4-inch patchwork foot with guide F057
- Quilting guide F016N
- Open toe quilting foot F061
- Quilting foot F005N
- Walking foot F034N
- Free motion guide grip FMG2
Manuals
Any questions?
Call +370 685 85915 or email info@siuvimomanija.lt. We will help you check whether this sewing machine is right for your work.